DIY Bathroom Remodel - Before & After
The bathroom is finished! Woohoo! I’m so excited to be done! I now have two whole rooms that are completely finished in my house. 😀 And they just happen to be the two most challenging — a total gut and remodel of a kitchen and a bathroom. The rest of the rooms should feel like a walk in the park after these!
I started this remodel on January 22nd — almost exactly six months ago — and have been working on it off and on since then. I took a break during my father-in-law’s two-week visit in March, another break during my two-week blogging break, and yet another break while I finished up the condo. So if I had to guess, I’d say it took an actual three-and-a-half months of work. But IT IS DONE!!
DIY bathroom remodel with tile floor, stained wood slat ceiling, DIY vanity, recessed panel walls, and bifold closet doors used as double doors" width="480" height="720" />
And since I regularly have people ask me, “Do you actually do all of the work yourself?” I need to give credit where credit is due.  I do have a plumber who I hire to do all of my plumbing for me. (Yes, I’m sure I could do plumbing, but I just don’t want to. ) My brother-in-law helped me wire the new lighting and outlets. My neighbor and his son and friend helped me remove the old cast iron bathtub, and I also payed them to haul away the 39 heavy bags full of old broken tile and mortar, as well as some other construction debris.
Everything else I did by myself, from breaking out the old tile and mortar and bagging it up, laying new subfloor and concrete board, installing the concrete board around the bathtub, installing new drywall (even on the ceiling!), installing all of the tile on the floor and bathtub surround, building and installing the new vanity, building the built-in storage area, and on, and on. So I would guesstimate that I did at least 95% of this remodel by myself.
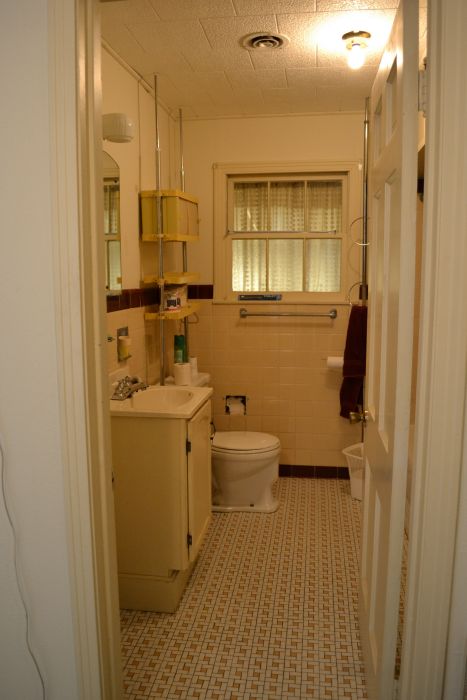
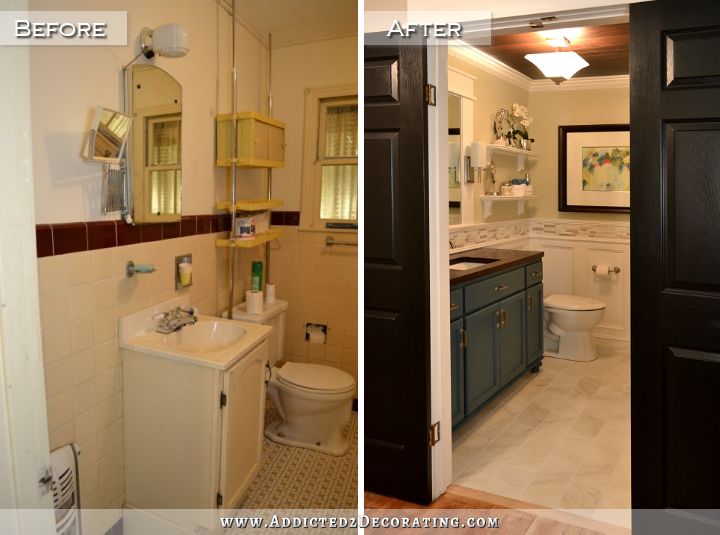
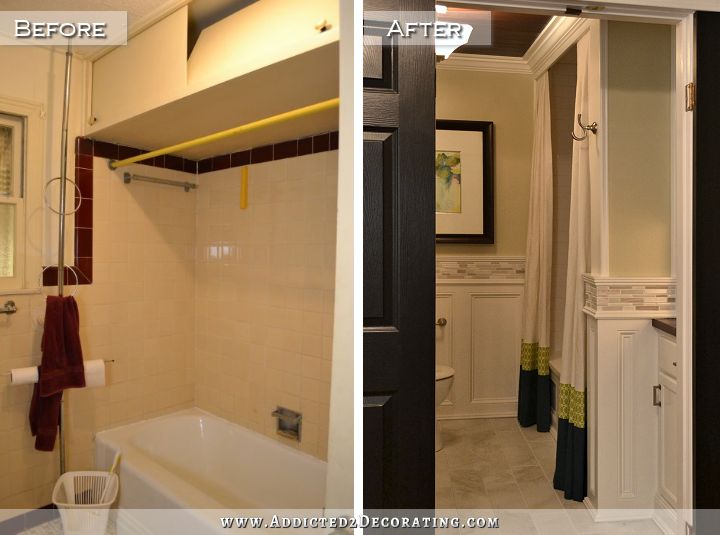
Anyway, let’s get on to some pictures, shall we? When we bought the house, the bathroom was not only very dated, but it was also incredibly inefficient, with a huge storage cabinet above the tub that was pretty much inaccessible to me, a tiny sink and vanity, and a vanity light with a pull chain. The only outlet in the room was the one on the vanity light, and I couldn’t even reach it, so I basically had a bathroom with no usable outlets. There was also an unneeded window. It was originally an exterior window, but now it looked into the sunroom, which will eventually be a hallway once we do our big remodel back there, so I decided to remove it.
I gutted everything, right down to the floor joists, studs, and ceiling joists, and then rebuilt the bathroom. It looks absolutely nothing like it did before.
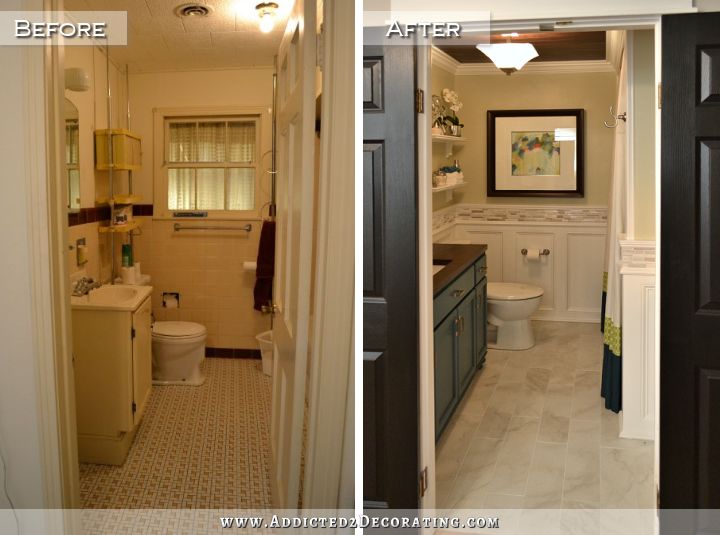
That’s a pretty drastic change, right?! 😀 Here’s a side-by-side view of the before and after…
 Bathroom remodel - before and after - 1940s original bathroom before, and updated modern bathroom after" width="720" height="535" />
As I mentioned, the old vanity was tiny, and the only outlet was on that vanity light. All of the cream and maroon tile made the bathroom feel a bit dreary and depressing to me, and that mirror was way too high to actually be usable to me. (I’m only five feet tall, and that thing was high!)

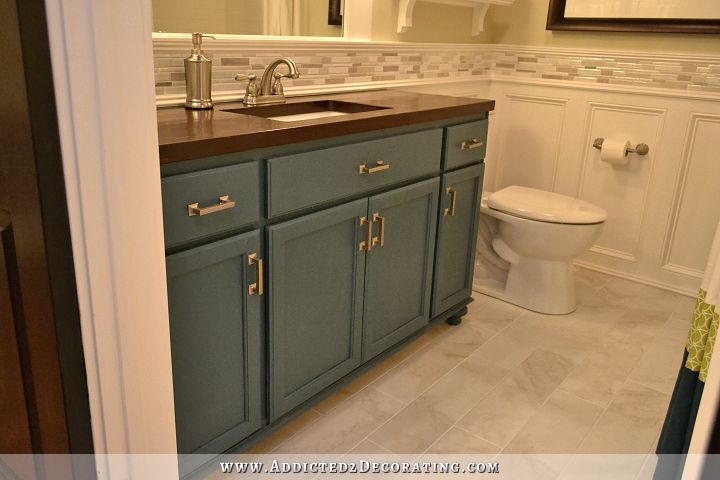
But now I have a much bigger vanity, with usable counterspace, lots of storage, actual usable outlets, and a mirror that I can actually use and see more than just my face from the chin up. 😀
DIY bathroom remodel with vanity made from stock oak cabinets and bifold closet doors used as double doors" width="480" height="720" />
FYI, the floor in the hallway is looking a bit rough now, where I installed the threshold, filled in the missing boards after moving the door, and after dragging 39 bags of debris through there. I’ll repair all of that, including that one transition threshold board, when I work on the hallway. So just ignore that and only look at the tile. 😉
 bathroom remodel before and after - early 1940s / late 1950s original bathroom" width="720" height="535" />
It’s hard for me to imagine now that the bathroom ever looked like that, but it’s even harder to imagine that it looked like this at one point.
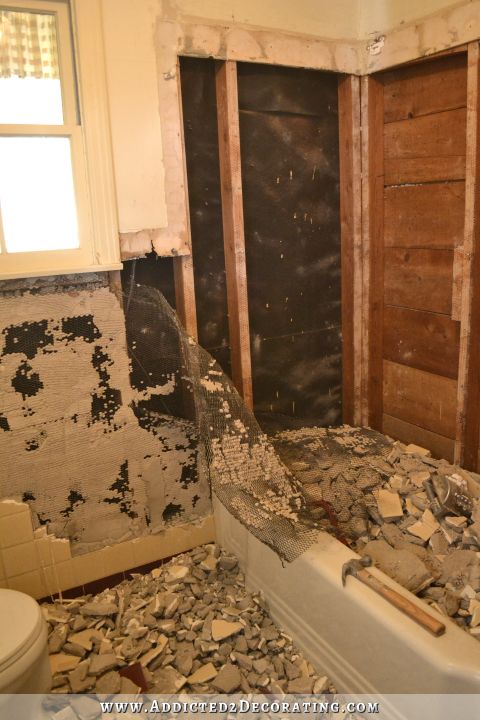

 bathroom remodel - 1940s tile, thick mortar bed, and wire removed from walls and floor" width="480" height="720" />
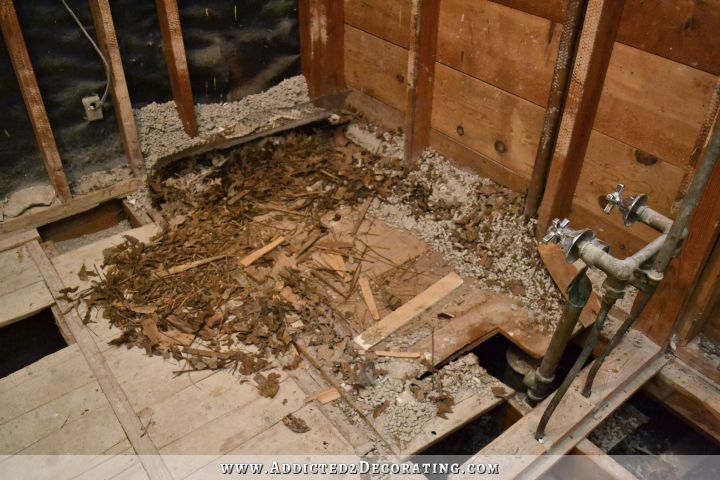 cast iron bathtub removed - nest and leaves underneath, and damaged / old / rotted subfloor" width="720" height="480" />
But the hardest thing to believe is that I don’t think I ever shed any tears from being overwhelmed by the process or the condition of my bathroom at any point during this remodel. Now temper tantrums on the other hand…there were definitely a few of those, like when I was installing the concrete board around the tub by myself, and I was trying to install the middle full piece on the long wall, requiring me to lift it up over my shoulders, and just as I almost had it in place, the top started to tilt towards me and it landed on my head. Yes…temper tantrum, not so lady-like language…you name it. But I don’t remember ever just having a good ole sob party from being overwhelmed. Even when most of the subfloor was removed, and I could just see straight through to the dirt below, I was fairly confident that I could get it done. Not completely confident, but fairly confident. 😀
Anyway, moving on…
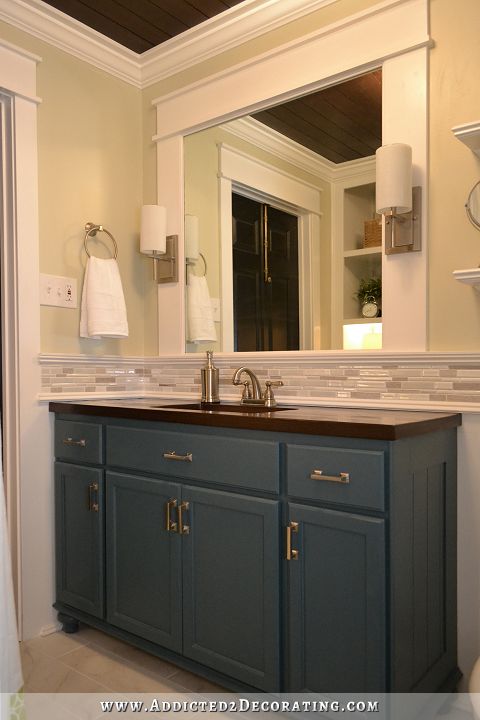
I made the vanity out of three stock unfinished oak cabinets from Home Depot, by attaching them together with wood glue and screws, and then adding decorative feet. The countertop is made out of pine 2″ x 3″ lumber, and the mirror was really simple to make. I trimmed it out just like I trim out my doors. I made the shelves completely from scraps of MDF and trim.

The ceiling was originally covered in 1 x 4’s and polystyrene tiles, just like the rest of the house.

Once the tiles and 1 x 4’s were removed, it made the old drywall crumble, so I had to re-drywall the ceiling. Then I decided to add a wood slat design to the ceiling using strips of stained 1/4-inch plywood.
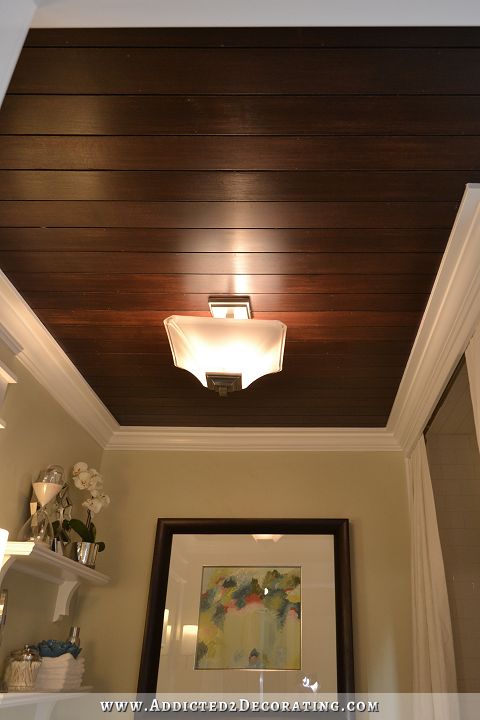
I was afraid that the dark ceiling might make the room look dark, or make the ceiling look really low, but it doesn’t. In fact, it had the opposite effect. The ceiling in this room feels so much higher to me than the rooms with just white drywall.
The bathtub originally had this storage cabinet that someone built just above the tile surround. I didn’t find it very functional at all because it was so deep that reaching the back of the cabinet and actually utilizing all of that space was impossible.
 cast iron bathtub in late 1940s / early 1950s bathroom, with storage above, probably added in the 1970s" width="467" height="700" />
Plus, it was like showering in a cave. Now the tub area feels so spacious.
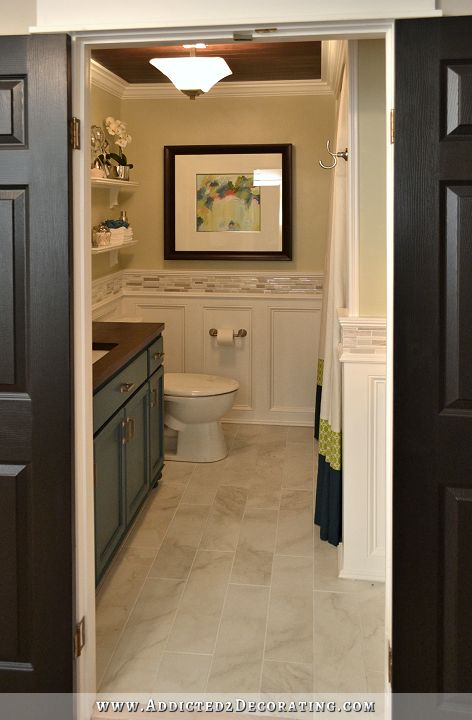
The main shower curtain is purely decorative. In fact, this time I made the panels stationery and hung them with Velcro, so they can’t close. The actual usable shower curtain is tucked in behind the front shower curtain panel.

And since I use the breathable fabric hotel liners (not plastic), it dries perfectly fine being tucked in behind there. I’ve never even once had a problem with mold or mildew on these liners, even though I always keep my shower curtains open. I don’t like closed shower curtains. Not only do they make bathrooms feel tiny, but in this case, a closed shower curtain would hide the paneled bathtub skirt.
 paneled bathtub skirt for a standard bathtub" width="720" height="480" />
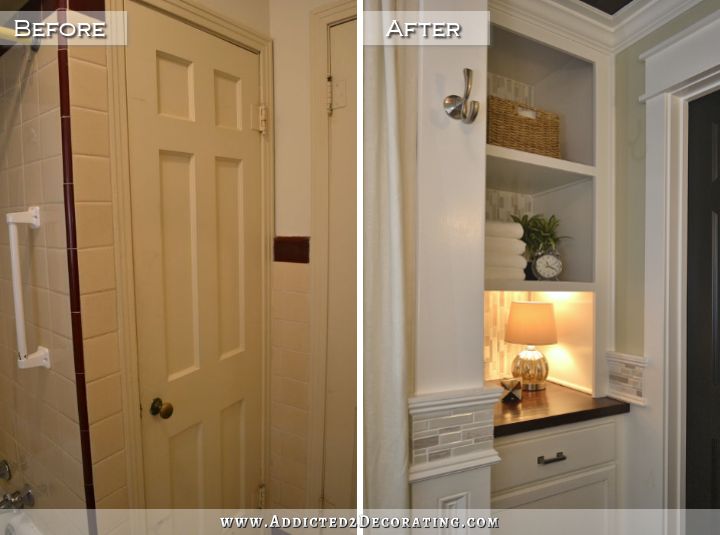
The original storage closet was behind the bathroom door. It actually provided quite a bit of usable storage space.

But as I was rebuilding the bathroom, I decided I wanted something a little different. The closed-in closet made the bathroom feel really small, so I opted for a closed cabinet on bottom with open shelving on top.

 bathroom remodel before and after - linen closet replaced with open shelving" width="720" height="535" />
 bathroom remodel before and after - linen closet replaced with lower cabinet with open shelves on top" width="720" height="535" />
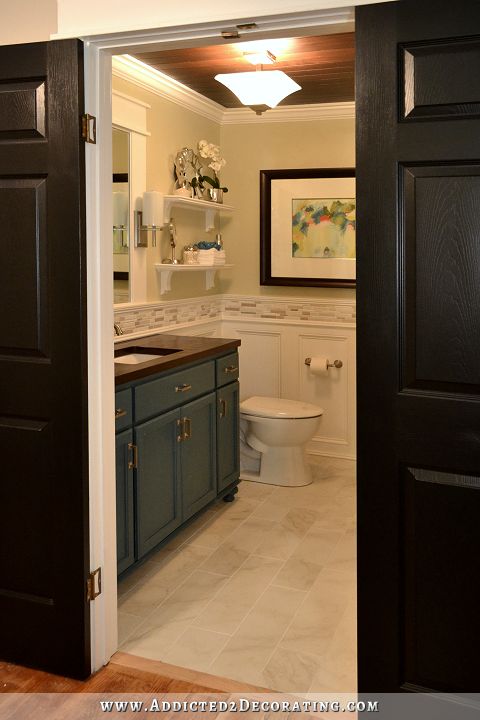
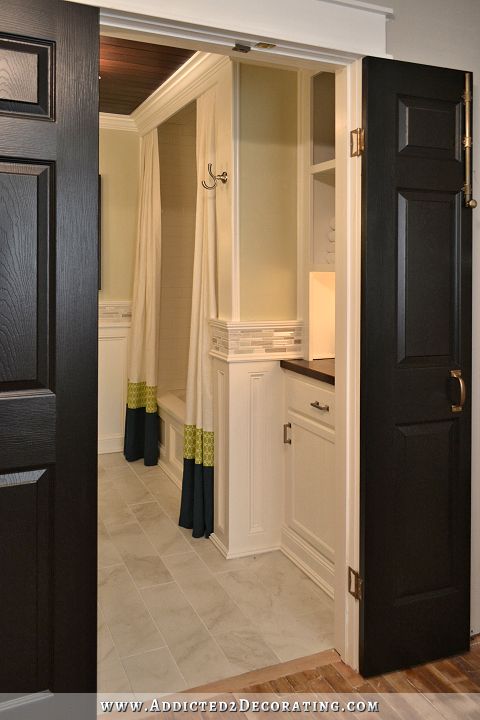
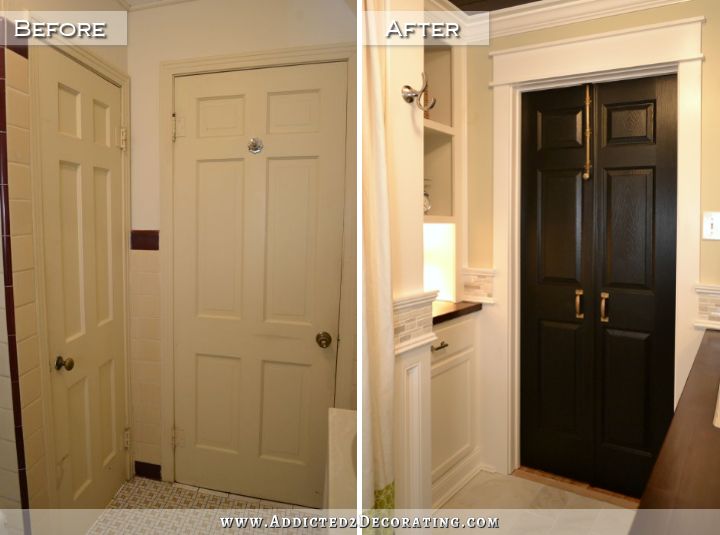
The double doors may be my favorite part of this bathroom remodel. The original door opened up into the bathroom, which was another thing that made this bathroom feel so tiny and cramped.
Since it’s just a standard 32-inch wide doorway, and double doors for that size would have been a custom order (read: expensive), I ended up making my own double doors out of bi-fold closet doors. I also moved the whole doorway over about 10 inches to make room for a larger vanity.
 fold closet doors used as double doors" width="480" height="720" />
 bathroom remodel - linen closet replaced with open shelves" width="720" height="535" />
The whole room just feels so much bigger to me now, even though it’s still the same 8′ x 8′ space.

I actually really did like the style of the original floor, and was kind of sad to see it go. But the whole reason I started this remodel was because the 1/2-inch lip of tile going from the hallway into the bathroom made this room inaccessible to Matt. So the vintage tile had to go. (Plus, that flesh-colored tile really wasn’t my thing. Had it been white and black, that would have been hard to tear up.)
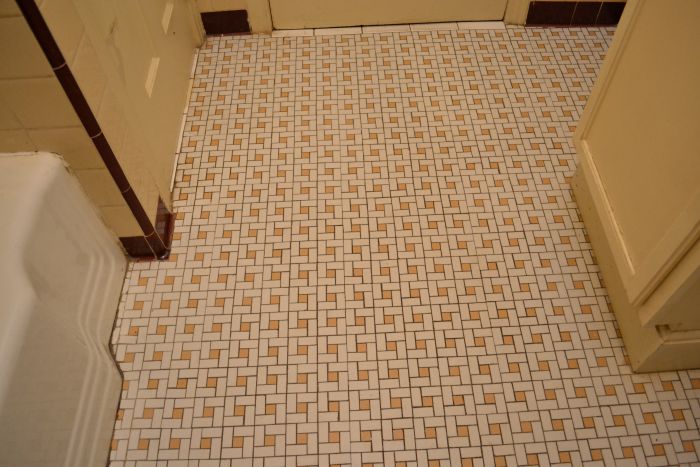
I love the new 6″ x 24″ tile that I used. It has a marble effect, and looks so light and bright. But best of all, it is now perfectly level with the hardwood floor in the hallway, so Matt can easily access this room. I originally used Alabaster grout on the floor, and it ended up looking dirty and dingy. So I went back over it with Grout Renew in Bright White, and it made SUCH a huge difference! Now it looks bright and clean, and it made the grout lines kind of disappear, allowing the tile to be the focus. Before, with the Alabaster grout, the grout lines kind of jumped out at you, stealing attention from the tile.

And that’s pretty much it! Here are a few more pictures…
 bathroom remodel - vanity made from stock oak cabinets, DIY wood butcherblock-style countertop, recessed panel walls with mosaic tile accent" width="720" height="480" />
 bathroom remodel - DIY wood butcherblock style countertop, wide framed mirror with sconces" width="480" height="720" />
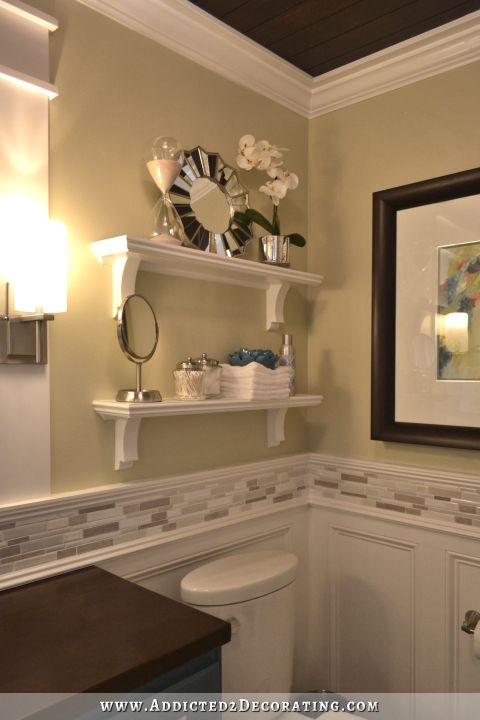 bathroom remodel - open shelves above toilet" width="480" height="720" />
 bathroom remodel - open shelves above toilet, colorful abstract artwork" width="480" height="720" />
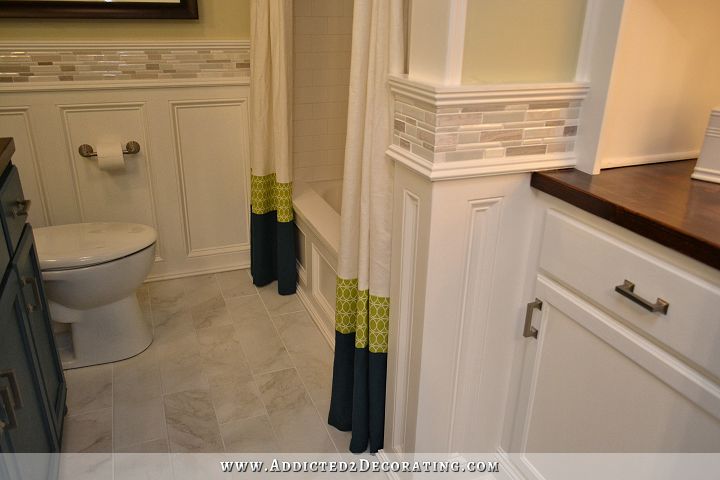 bathroom remodel - recessed panel walls with mosaic tile accent, DIY wood tub skirt for standard tub" width="720" height="480" />
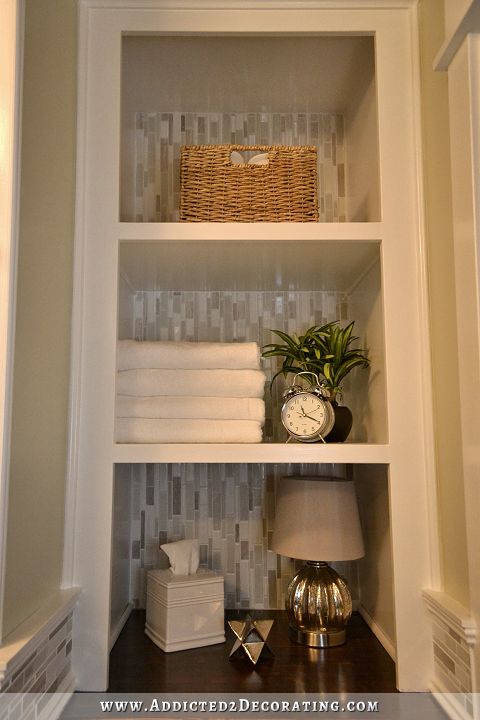 bathroom remodel - original linen closet replaced with open shelves" width="480" height="720" />
 bathroom remodel - original linen closet replaced with lower cabinet with open shelves above" width="480" height="720" />
 bathroom remodel - original linen closet replaced with lower cabinet with open shelves above" width="480" height="720" />
 bathroom remodel - standard door replace with bifold closet doors installed as double doors to save space" width="480" height="720" />
So now to the big question. How much did this remodel cost? $3968. And that includes the $1000 that I paid my plumber and my neighbor. I did get some things free, though, like the sink, faucet, tub faucet, and drawer/door pulls. I think that’s it, so if you add the cost of those things, I’m looking at a $4400 remodel.
That’s not too bad, right? Considering that this was a down-to-the-studs (and ceiling joists, and floor joists) remodel, and everything in here is new, I don’t think that’s bad at all! A temporary, lipstick-on-a-pig makeover that I had originally planned to do would have been considerably cheaper, but it would have been temporary. So I’m much happier that I went this route.
bathroom remodel before and after" width="720" height="535" />
Projects, Products & Sources:
Here are few of my favorites:


Komentar
Posting Komentar